
Setting up Email Account on Microsoft Outlook 2010
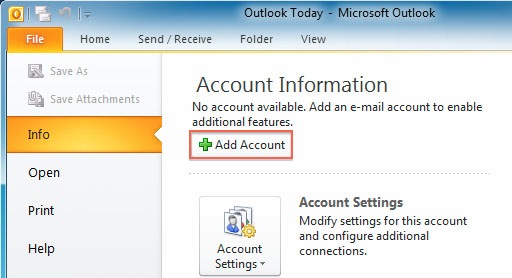
1). Click on the File tab, select Info, and then click on the Account Settings button and select Account Settings.
2). Click on New to add your Hover email address. Outlook 2003: Select POP3 or IMAP3 and click Next. 3.) Check the box for “Manually configure server settings or additional server types” & then click Next.

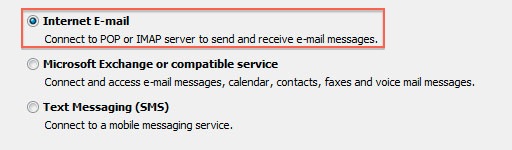
4.) Put the bullet next to “Internet E-mail” then click Next.
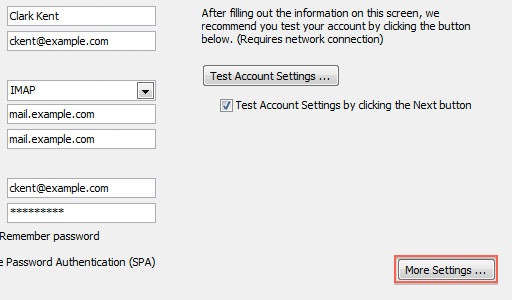
5.) Type in Your Name/E-mail Address, Incoming/Outgoing mail servers, User Name/Password
& then click More Settings.** Please note that the Domain Name used for the configuration here is ‘q.com’For Free Email Service / Email Hosting Plans
Incoming & Outgoing mail server: You can obtain this information from your Email Dashboard. In Dashboard go to Mail > DNS Configuration and POP/IMAP/SMTP records. Or if you are using our DNS service for your domain then you can use:
Incoming Mail Server: pop.your-domain-name (eg: pop.demomonkey.org)
Outgoing Mail Server: smtp.your-domain-name (eg: smtp.demomonkey.org)***For IMAP configuration,
Account Type: IMAP
Incoming Mail Server: imap.your-domain-name (eg: imap.demomonkey.org)
Outgoing Mail Server: smtp.your-domain-name (eg: smtp.demomonkey.org)

6.) Click the More Settings button.
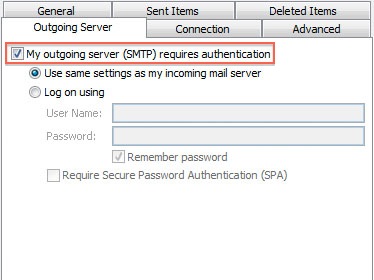
7). On the Outgoing Server tab put a check mark next to “My outgoing server (SMTP) requires authentication”
& then put the bullet next to “Use same settings as my incoming mail server”.
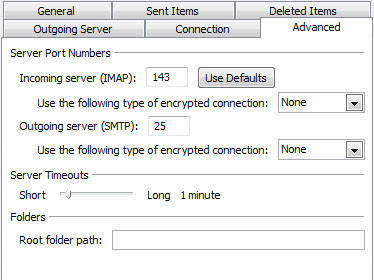
7.) On the Advanced tab change the Outgoing server (SMTP) port
to 587, change the encrypted connection to None & then click OK.Tick on Leave a copy of messages on server as per your preference.***For POP configuration,
Incoming (POP) Server Port Number: 110
Outgoing (SMTP) Server Port Number: 587***For IMAP configuration,
Incoming (IMAP) Server Port Number: 143
Outgoing (SMTP) Server Port Number: 587
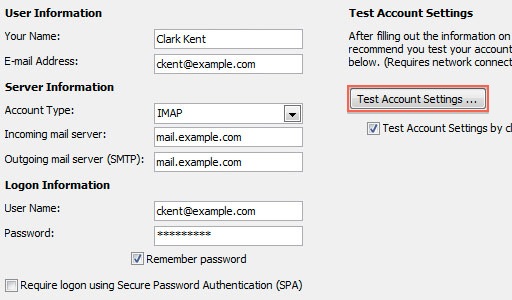
8.) Click on Test Account Settings to test the configuration
Click Next.
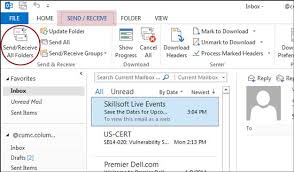
9.) Click Finish. 10.) Click Close. 11.) Click Send/Receive to get your mail. You have successfully configured your Email Address to your Email Client ‘Outlook Express’
You can try sending a Test Email and Test the Accounts Settings.
Setting up Email Account on Microsoft Outlook 2013
- When you first open Outlook, it will provide a “Welcome to Outlook 2013” message, click the Next button.
- The next screen will ask “Do you want to set up Outlook to connect to an email account?” choose Yes and click the Next button.
- On the Auto Account Setup menu, select the option for Manual setup or additional server types, then clickNext.

On the Choose Service menu, click the POP or IMAP option then click the Next button.
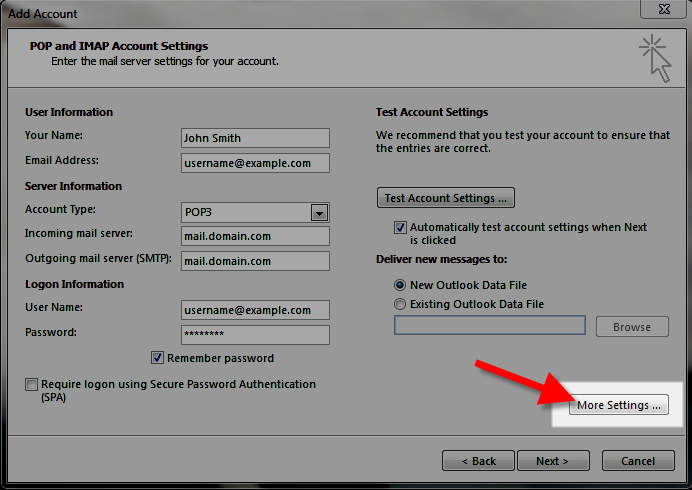
You will then see the POP and IMAP Account Settings menu, fill in the fields.
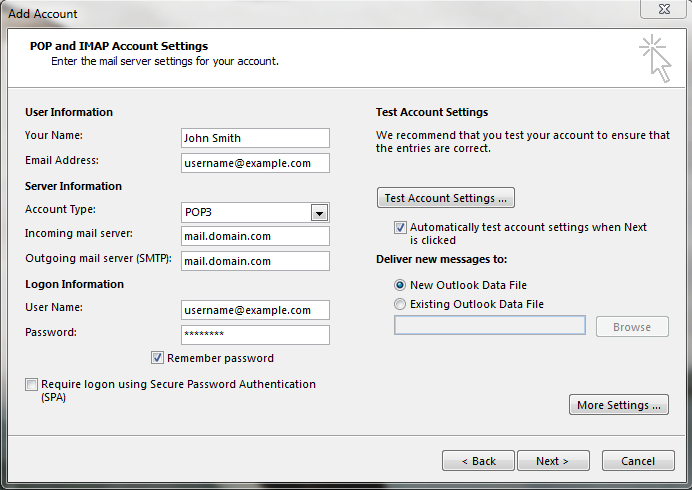
Below is a description of the fields:
| Option | Description |
|---|---|
| Your Name | Enter the name you want people you email to see, such as: John Smith |
| Email Address | Enter your full email address, such as: [email protected] |
| Account Type | Choose if you want to use POP or IMAP. By default, POP downloads and removes your emails from the server, while IMAP leaves them on the server. In our tests, we are setting up a POP account. |
| Incoming mail server | Standard settings: imap.domain.com OR pop.domain.com (Replace domain.com with your actual domain) |
| Outgoing mail server (SMTP) | Standard settings: smtp.domain.com (Replace domain.com with your actual domain) |
| User Name | Enter your full email address, such as: [email protected] |
| Password | Enter the password you for this email address. |
| Remember password | I recommend checking this box, so Outlook will save your password. |
| Require logon using (SPA) | Do not check this box. |
- Click the More Settings button.
- Click the Outgoing Server tab.
Check “My outgoing server (SMTP) requires authentication“.
Check “Use same settings as my incoming mail server“.

- Click the Advanced tab.Enter your settings, below is a description of the available options.
Option Description Incoming Server Choose your preferred settings, below are the available options. Standard (POP3): 110 Standard (IMAP): 143 SSL (POP3): 995 SSL (IMAP): 993 This server requires an encrypted connection (SSL) Click this if you are using the SSL option. Outgoing Server Standard: 25* or 587 SSL: 465 *Often times, ISP’s will block this port for use with their email. You may want to consider using port 587, or the secure settings. Use the following type of encrypted connection: Standard: None SSL: SSL - Click the OK button.
- Click the Next button, Outlook will test the the account settings.
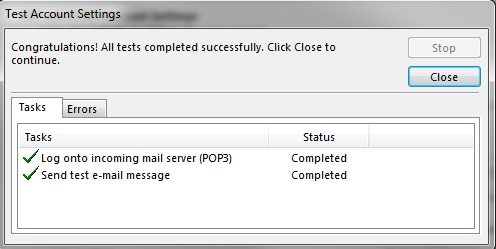
- You will see two tasks: Log onto incoming mail server, and, Send test e-mail message. When they are complete, Close button.
- You will see a message stating “You’re all set!” click the Finish button.
Setting up Email Account on Microsoft Outlook Express
Follow the steps detailed below to use Microsoft Outlook Express 6.0 to send/receive emails from your Email account.
- Start Outlook Express 6.0. On the Tools menu, click Accounts…
- In the Internet Accounts dialog box, click Add, and then click Mail…
- In the Display name box, type the name that you would like others to see when you send a message and then click Next.
- In the E-mail address box, type the email address for the account that you are using (for example, [email protected]) and then click Next.
- Under E-mail Server Names, click the appropriate incoming e-mail server type POP3/IMAP (Post Office Protocol version 3 [POP3] is the default type)
- Incoming & Outgoing mail server: Incoming & Outgoing mail server: You can obtain this information from your Email Dashboard. In Dashboard go to Mail > DNS Configuration and POP/IMAP/SMTP records. Or if you are using our DNS service for your domain then you can use: Incoming Mail Server: pop.your-domain-name (eg: pop.demomonkey.org)
Outgoing Mail Server: smtp.your-domain-name (eg: smtp.demomonkey.org)***For IMAP configuration,
Account Type: IMAP
Incoming Mail Server: imap.your-domain-name (eg: imap.demomonkey.org)
Outgoing Mail Server: smtp.your-domain-name (eg: smtp.demomonkey.org)
- Incoming & Outgoing mail server: Incoming & Outgoing mail server: You can obtain this information from your Email Dashboard. In Dashboard go to Mail > DNS Configuration and POP/IMAP/SMTP records. Or if you are using our DNS service for your domain then you can use: Incoming Mail Server: pop.your-domain-name (eg: pop.demomonkey.org)
- Now, type your complete email address and password in the respective fields and click Next.
- The following window will display the success message – Congratulations, you have successfully entered all of the information required to set up your account. To save these settings, click Finish.
- Open the Internet Accounts dialog box referring to steps 1 and 2. In the Mail view, you will see the Account you have just added. Now you need to click Properties.
- Under the Servers tab, you need to check the checkbox My server requires authentication placed under Outgoing Mail Server. Once this is done, click Apply.
IMPORTANT
Usually, the port used for the Outgoing Mail Server/SMTP Service is 25. However, there might be a situation where your ISP might be blocking the use of port 25 for SMTP service. Many ISPs block port 25 in order to minimize the amount of spam sent using their network. If you are facing issues sending mails using the default port 25, you can confirm with your ISP whether port 25 is indeed blocked by them.
To circumvent this, you can use an alternate port 587 for sending mails if port 25 is blocked. Here’s how:a) In Outlook Express, on the Tools menu, click Accounts
b) Select the email account you wish to modify and click Properties
c) Under the Advanced tab, replace the default port number 25 with the alternate port number 587 in the field provided for Outgoing mail (SMTP)
d) Click OK and then Close to save the changes ANNOUNCEMENT
SSL/TLS option has been enabled on our servers. The SSL/TLS option will run on the default ports. That means, you do not need to change the port numbers for the SSL/TLS option to work.
Steps to configure TLS/SSL in Outlook Express
a) Go to Outlook Express -> Tools -> Account
b) Click on Mail tab -> highlight your email account -> Properties
c) Click on “Advance” tab, Server Port No. for Outgoing Mail SMTP change to 25/587
d) Server Port No. for Incoming Mail POP3 is 995 and IMAP at 993
e) Check both the “This server require a secure connection (SSL)”
f) Click OK and Close the “Account” Window.
Your setup is complete. When you click on the Send/Receive button, your email will be downloaded by Outlook Express.