
Step 1: Get your CNAME from Blogger setting
- Sign in to Blogger.
- Select the blog you want to update.
- On the left, click Settings and then Basic.
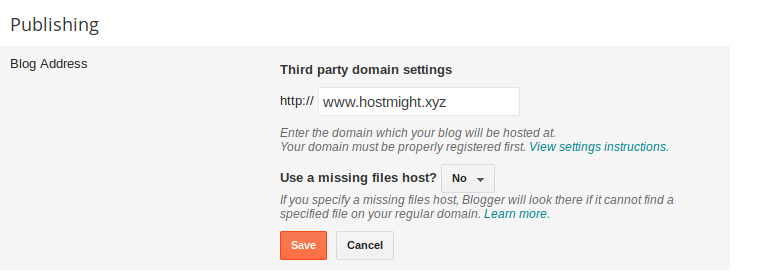
- Under “Publishing,” click + Setup a 3rd party URL for your blog. Type the URL of the domain you’ve purchased.
- Click Save.
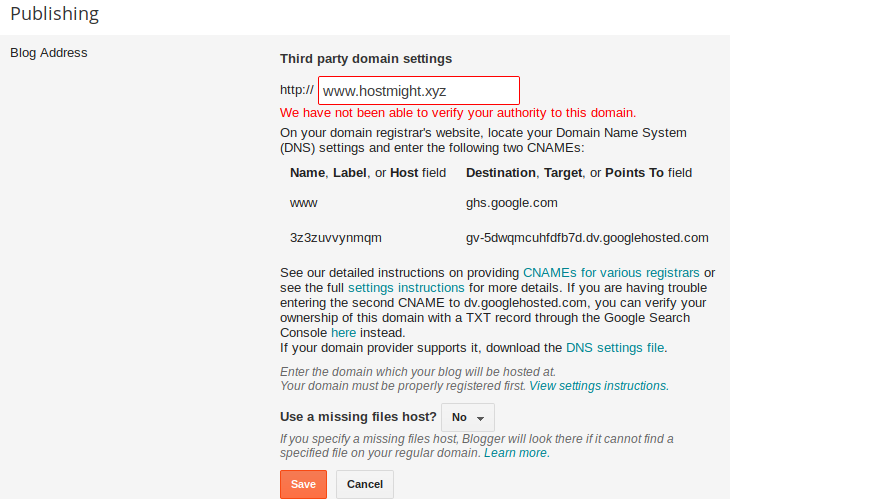
- You’ll see an error with two CNAMEs.
Name, Label or Host: Enter the name as the subdomain, like "blog." or "www." For destination, enter "ghs.googlehosted.com."
Destination, Target or Points to: This is different for each person and is specific to your blog and your Google Account.
Step 2: ADD 4 “A” Record into your Domain
- Now, login to your HostMight client area at https://secure.hostmight.com/clientarea.php
- Once you logged in, click on Domains -> My Domains
- After that, click on Manage Domain button against your domain name for which you want to use with Blogger.
- Now Click on “DNS Management” tab At the bottom of the Domain Manager Page, you will see a section under the heading DNS Management where you can add “A” record. Add IP addresses as below, one-by-one
216.239.32.21
216.239.34.21
216.239.36.21
216.239.38.21
To enter a Host Record, you will need to fill in each of the fields on each row. Which means a complete Host Record will include a Host Name, a Record Type, and Address. And finally “Save Changes.”
For example : Host Name : @ Record Type : A Address : 216.239.32.21

Repeat the same steps and add 3 additional A records pointing to IP addresses 216.239.34.21, 216.239.36.21, and 216.239.38.21
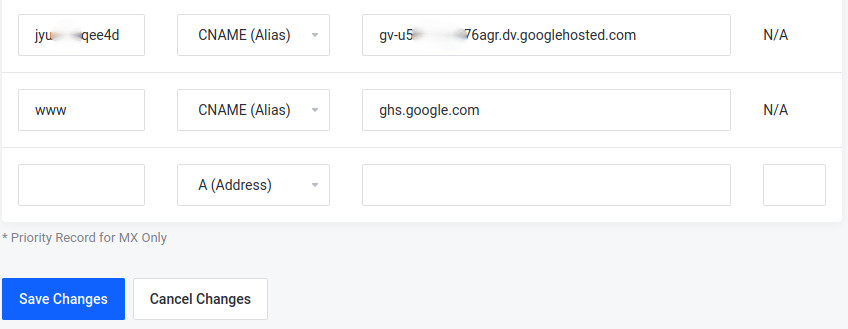
Step 3: ADD CNAME Record into your Domain
From the same “DNS Management” section “Add CNAME” record :
- Host Name : www Record Type : CNAME Address : ghs.google.com
- Click “Save Changes”
- Now add 2nd CNAME : You will find the record in blogger settings
- Host Name : xxxxxxxxxxx Record Type : CNAME Address : gv-xxxxxxxxxxxxxx.dv.googlehosted.com
- Click “Save Changes”
Please be aware that it might take some time for your DNS changes to propagate. so please wait 0-24 hours and then complete the step 4.
Step 4: configure your settings with Blogger
Once you’ve put in the “CNAME” and “A” records within your DNS management settings, you will need to go back to the blog Settings window:
- Sign in to Blogger.
- Select the blog you want to update.
- On the left, click Settings and then Basic.
- Under “Publishing,” click + Setup a 3rd party URL for your blog.
- Type the URL of the domain you’ve purchased.
- Click Save.
- You will notice that the error message has gone away. If this is the case then your domain name should be successfully connected to your blog.